Set up the Zone Configuration Details
Important: There are multiple pages that you must go through to create a zone configuration. To move forward to the next page, you must first ensure that the required fields are completed on the current page. For example, to save the zone, you must first enter the required fields on the Operation page, and then go to Step 2-Rate Calendars to ensure that you have at least one rate calendar assigned to the zone.
To add the zone details:
- From the Navigation Panel, select Zones. The Zones tab is the default selection.
-
Click the Add Zone button. The first page is the Zone Operation page.

- In the Name field, enter the name you want to give your zone. This is used to identify the specific zone configuration within the Online Configuration application.
-
In the Operation Mode area, select the type of parking available within the zone:
Option (Sub-option) Description Pay by License Enable this to allow for pay by license plate parking within this zone. (When enabled the following three further options display.) Note: You can mix Pay and Display with Pay by License but you cannot add Pay by Stall. Enable Receipts From the drop-down list, select if you want receipts printed during a pay by license transaction. Your options include: Yes, No, Optional (where the parker can decide to print the receipt or not). Limited Use Parking Count Set the number of times the parker (by license plate) can park in the current zone using the limited rate. Preferred Parking Offline Mode Enable this checkbox to allow parkers to receive the preferred rate when the pay station is offline. Pay by Stall/Space Enable this to set up your parking for payment by stall number. If you enable this checkbox, the following three options display. Note: Pay by Stall cannot be used with any other enforcement type. Stall Range Define the range and/or the individual stalls that make up your parking operation for the current zone (between 1 and 99,999). To enter a range, use a dash to separate the beginning and end of the range (for example 1-50). To enter individual stall numbers, use a comma to separate the stall numbers (for example, 25, 30). You can set up a mix of a range or ranges and individual stall numbers. For example, 1-10, 15, 17, 18, 80-100. Note that if you define a rate to apply for specific stalls, the stalls must be defined in the zone to display as an option to the parker. For example, if you set up your stall range as 1-50, but set up your rates to apply to stalls 1-75, only stalls 1-50 will display at the pay station for that rate. See Add a Rate for more details about setting up a rate. Stall digits to continue When enabled, the pay station will automatically advance to the next screen when the parker presses the maximum number of digits available for a stall. For example, if your operation has 50 stalls defined and the parker presses two digits (such as 1, then 5), the next screen in the transaction workflow automatically displays. The parker does not need to press OK. Another example would be if you defined the stall range to be three digits (such 1-150). If the parker enters a stall number with three digits, the next transaction screen automatically displays.
If you leave this checkbox disabled, the parker must press [OK] after entering the stall number to advance to the next screen in the transaction process.
Use add time number If you use the Add Time feature, enable this checkbox to print a special number on the receipt that is required to add time to the permit. Enable Receipts Set the drop-down option to enable or disable receipts being printed at the pay station for Pay by Stall. Your options include: Yes (print a receipt), No (do not print a receipt), or Optional (give the parker the option of printing a receipt). Pay and Display Enable this checkbox to set up your parking operation where parkers print their permit receipts and place them on their dashboards. Note: You can mix Pay and Display with Pay by License but you cannot add Pay by Stall. Note: The parking type(s) you select for the zone override the parking types you defined for the availability schedules.
-
The Out of Service on Printer Error checkbox applies to Pay by License and Pay by Stall transactions. It lets you choose if you want the parker to have the choice if purchasing a permit when a receipt cannot be printed or automatically puttting the pay station out of service when the printer fails for some reason. For Pay & Display transactions, if the receipt cannot be printed, the pay station automatically enters an out of service mode regardless of the way this checkbox is set.
-
Enable: The warning message "Pay Station Out of Service" displays. The parker cannot proceed with the purchase of the permit.
-
Disable: The pay station displays a warning message to let the parker know that a receipt cannot be printed. The parker has the option of proceeding with the transaction purchase or cancelling the transaction altogether.
-
-
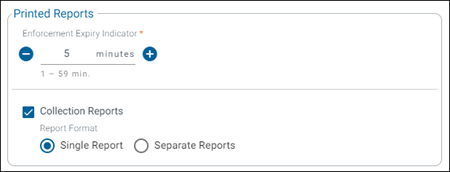
The Expiry Indicator field works with your Enforcement reports (for Pay by License Plate and Pay by Stall operations; Pay and Display enforcement must be done manually). Select the time (from 0 to 59 minutes) that you want to define as the time before the parking permit is about to expire. When you print the License Plate or Stall report, a star displays next to the license plate or stall number to indicate that it will expire within the configured number of minutes.

-
Enable or disable the Collections Reports checkbox depending on whether you want a collection report printed automatically when the coin or bill canister is removed from the pay station during a collection. If you do not want the report automatically printed, make sure this checkbox is disabled.
Important: Although you can disable the collection reports within OCA, this feature is not available at the pay station until Pay Station version 8.3.1 (or later). If an earlier version is installed, regardless of how the checkbox is configured, a collection report prints automatically when the bill or coin canister is removed.
-
If the Collection Reports checkbox is enabled, select one of the following options:
-
Single Report: Print the combined collection report for all available payment types.
-
Separate Reports: Print only the report for the specific payment type being collected. For example, coin, bill, or credit card.
-
-
If your pay stations within the zone have P2PE (EMV) card readers installed, toggle the EMV/P2PE setting to on. Then set up the time that your P2PE card reader updates are downloaded to the pay station and then installed on the card reader:
- SD5 Install Schedule: Set the time window where any new SD5 files (SD5 is the name of the card reader software) that were downloaded to the card reader can be installed. It's important to set the time when the pay stations are in low use as the pay stations are not operational for credit card payment until the installation is complete. If you are configuring solar-powered pay stations, you need to also ensure that the window is set to the time when the battery voltage is at its highest. If the update starts and a power failure occurs, it restarts the update and if not successful, could brick the card reader altogether.
-
SD5 Download Schedule: If the pay stations are solar powered, it's best to set the download time window to a time when the battery voltage is at its highest. If your pay stations are AC powered, set this to whatever time you wish. Note that this is the time that the files are downloaded to the card reader but are not yet installed on the card reader. The download does not impact the pay station's ability to accept card payments.

-
If the pay station uses the ID Tech (magstripe) card reader (that is, a non-P2PE/EMV card reader), enable the Legacy Credit Card toggle. Enable the Store and Forward checkbox to allow credit card transactions proceed should the pay station go offline. Store and Forward is not available for the P2PE/EMV card reader at this time. Note: There is no way to download stored credit card transactions to the Service Key and then upload them to Iris. Any stored transactions are forwarded as soon as the pay station goes back online. Select Duplicate Card Check to have the pay station prompt the parker to confirm payment if the previous transaction was made using the same credit card, or if that card was used as a contactless payment. Check with your merchant to guidance on whether to enable or disable this feature.

Set the Maximum Card Purchases Per Day field to limit the same credit card use per day to the number you configure (either unlimited or between 1 and 99). If the field is set to Unlimited, there is no restriction on credit card purchases from the same credit card Check with your merchant to guidance on whether to enable or disable this feature..
-
In the Online Timeout field, set up the number of seconds from 10 to 120 where if the credit card is not processed in that timeframe, the credit card transaction goes to store and forward (if enabled) or is denied and no longer available as a payment type. Note: Store and Forward can only be enabled for the ID Tech card reader. It is not allowed for the P2PE/EMV card reader at this time. If the P2PE transaction is not processed in the timeframe configured, it is denied.
-
Before you can save the Zone, you must attach at least one rate calendar to the zone. SeeAdd a Rate Calendar to a Zone for more details.
After you set up the details for the zone, you are ready to continue with the zone configuration: